
conchas: cafe mocha
Bittersweet & Chocolatey, I've got Autumn on my mind.

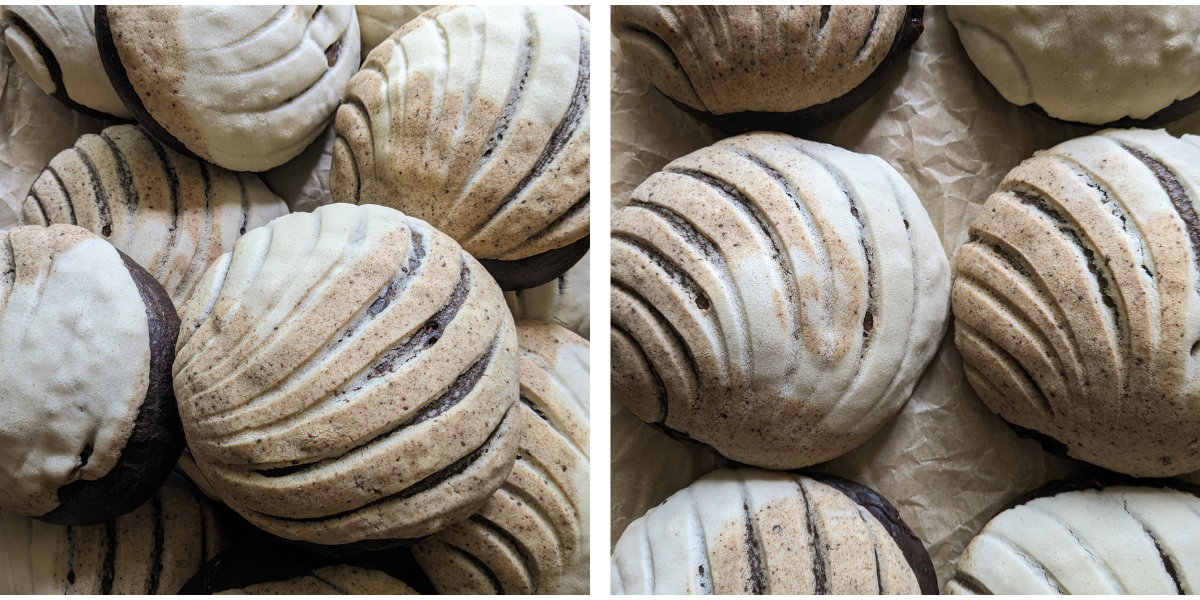
I offered these conchas back when I ran a home bakery business as a Fall menu item. I was really leaning into coffee/tea beverages as concha flavors, and it led to some interesting…tests, lol. I settled on Cafe Mocha and Masala Chai eventually, but the chocolate variation was my favorite of the two.
Chocolate Concha Dough
The chocolate base works well for other concha flavors if you’d like to branch out. I use a mix of black cocoa and Dutch processed cocoa. You do not want to use Hershey’s for this recipe, please use a higher quality cocoa powder if you can (Ghirardelli is a reliable cocoa found at most grocery stores, and I would opt for that over Hershey’s). Using a low quality cocoa can lead to a bland and unappealing flavor, since there isn’t much sugar in the dough to hide all your sins. Definitely go with the good stuff if you are able to, we want that cocoa flavor to shine.
Making the Dough
The mixing method used in this recipe is a simple one, however you absolutely do need a stand mixer for this to work. All the ingredients will be added at the beginning together, and as the mixture kneads you’ll notice it’ll take a bit longer to come together compared to other doughs, which is what we want. The flour is coated in fat early on in the mixing process, slowing the formation of gluten. So let the mixer work it’s magic for about half an hour or so, and take a moment to enjoy a meal or that Youtube video you’ve had on the watchlist. The end result will produce a softer, tender and still slightly chewy concha.
Also - please use a kitchen scale! Weigh your ingredients! Save precious time and dishes! Become a better baker in an instant with a kitchen scale!
CAFE MOCHA CONCHAS RECIPE
Makes: 12-14 Conchas | Prep Time: 1 hour & 30 minutes | Rest Time: 3.5 hours | Chill Time: 12 hours | Cook Time: 48 minutes
INGREDIENTS
Chocolate Concha Dough
500 grams bread flour (3 ¾ cups, spooned and leveled)
50 grams cocoa powder, sifted (½ cup black cocoa and/or dutch processed)
30 grams milk powder (4 tablespoons)
75 grams light brown sugar (about ⅓ cup, not compact)
1 tsp. instant coffee
1 tsp. kosher salt
3 large eggs
240 ml whole milk (8 ounces, warmed to 100-110 F)
1 tsp. honey (added to milk)
2 ¼ tsp. active dry yeast
1 TB. pure vanilla extract
165 grams salted butter, soft (6 ounces; not warm, not greasy, but soft)
120 grams chocolate chips (about ½ cup; I’m partial to Ghirardelli milk chocolate, but semi-sweet or dark also work fine!)
Concha Topping
135 grams confectioners’ sugar (about 1 ¼ cup, spooned and leveled)
135 grams all-purpose flour (1 cup, spooned and leveled; may sub with bread flour)
135 grams shortening (¾ cup)
2 tsp. pure vanilla extract
2 tsp. instant coffee, ground to a fine powder (use 1 tsp. for less intensity)
SPECIAL EQUIPMENT
1 stand mixer w/ dough hook attachment
INSTRUCTIONS
Prepare the Concha Dough
Warm the whole milk and honey to 100-110 F. Add the yeast and allow to activate for at least 5 minutes. If you don’t have a thermometer, the temp. of the milk should be just warm to the touch, not hot.
To the bowl of a stand mixer, add the bread flower, milk powder, sifted cocoa powders, brown sugar and salt. Whisk until fully combined.
Make a well at the center of the dry mix and add in the yeast and milk mixture, the instant coffee, vanilla, eggs and softened butter.
Combine using a rubber spatula or cleans hands until a shaggy dough forms.
Attach the bowl to the stand mixer and knead using a dough hook at medium speed (I alternate between speeds 4-5) until a soft, supple dough forms and pulls cleanly from the sides. This can take up to 30 minutes, sometimes 40 if you live in a hot place like me.
Tip: Resist the urge to add extra flour to the dough as it kneads. At first, the dough is going to look way too wet and weird and you’re gonna be like “ahhhhh this isn’t right”. But it is! However, if your dough has been mixing for at least 15 minutes, and you’re not noticing any stretch beginning to form, I suggest adding 1 tablespoon of flour, but NO MORE THAN 2 TABLESPOONS. Trust me, I’m a very impatient aries but good bread takes time, so let it do it’s thing and trust the process.
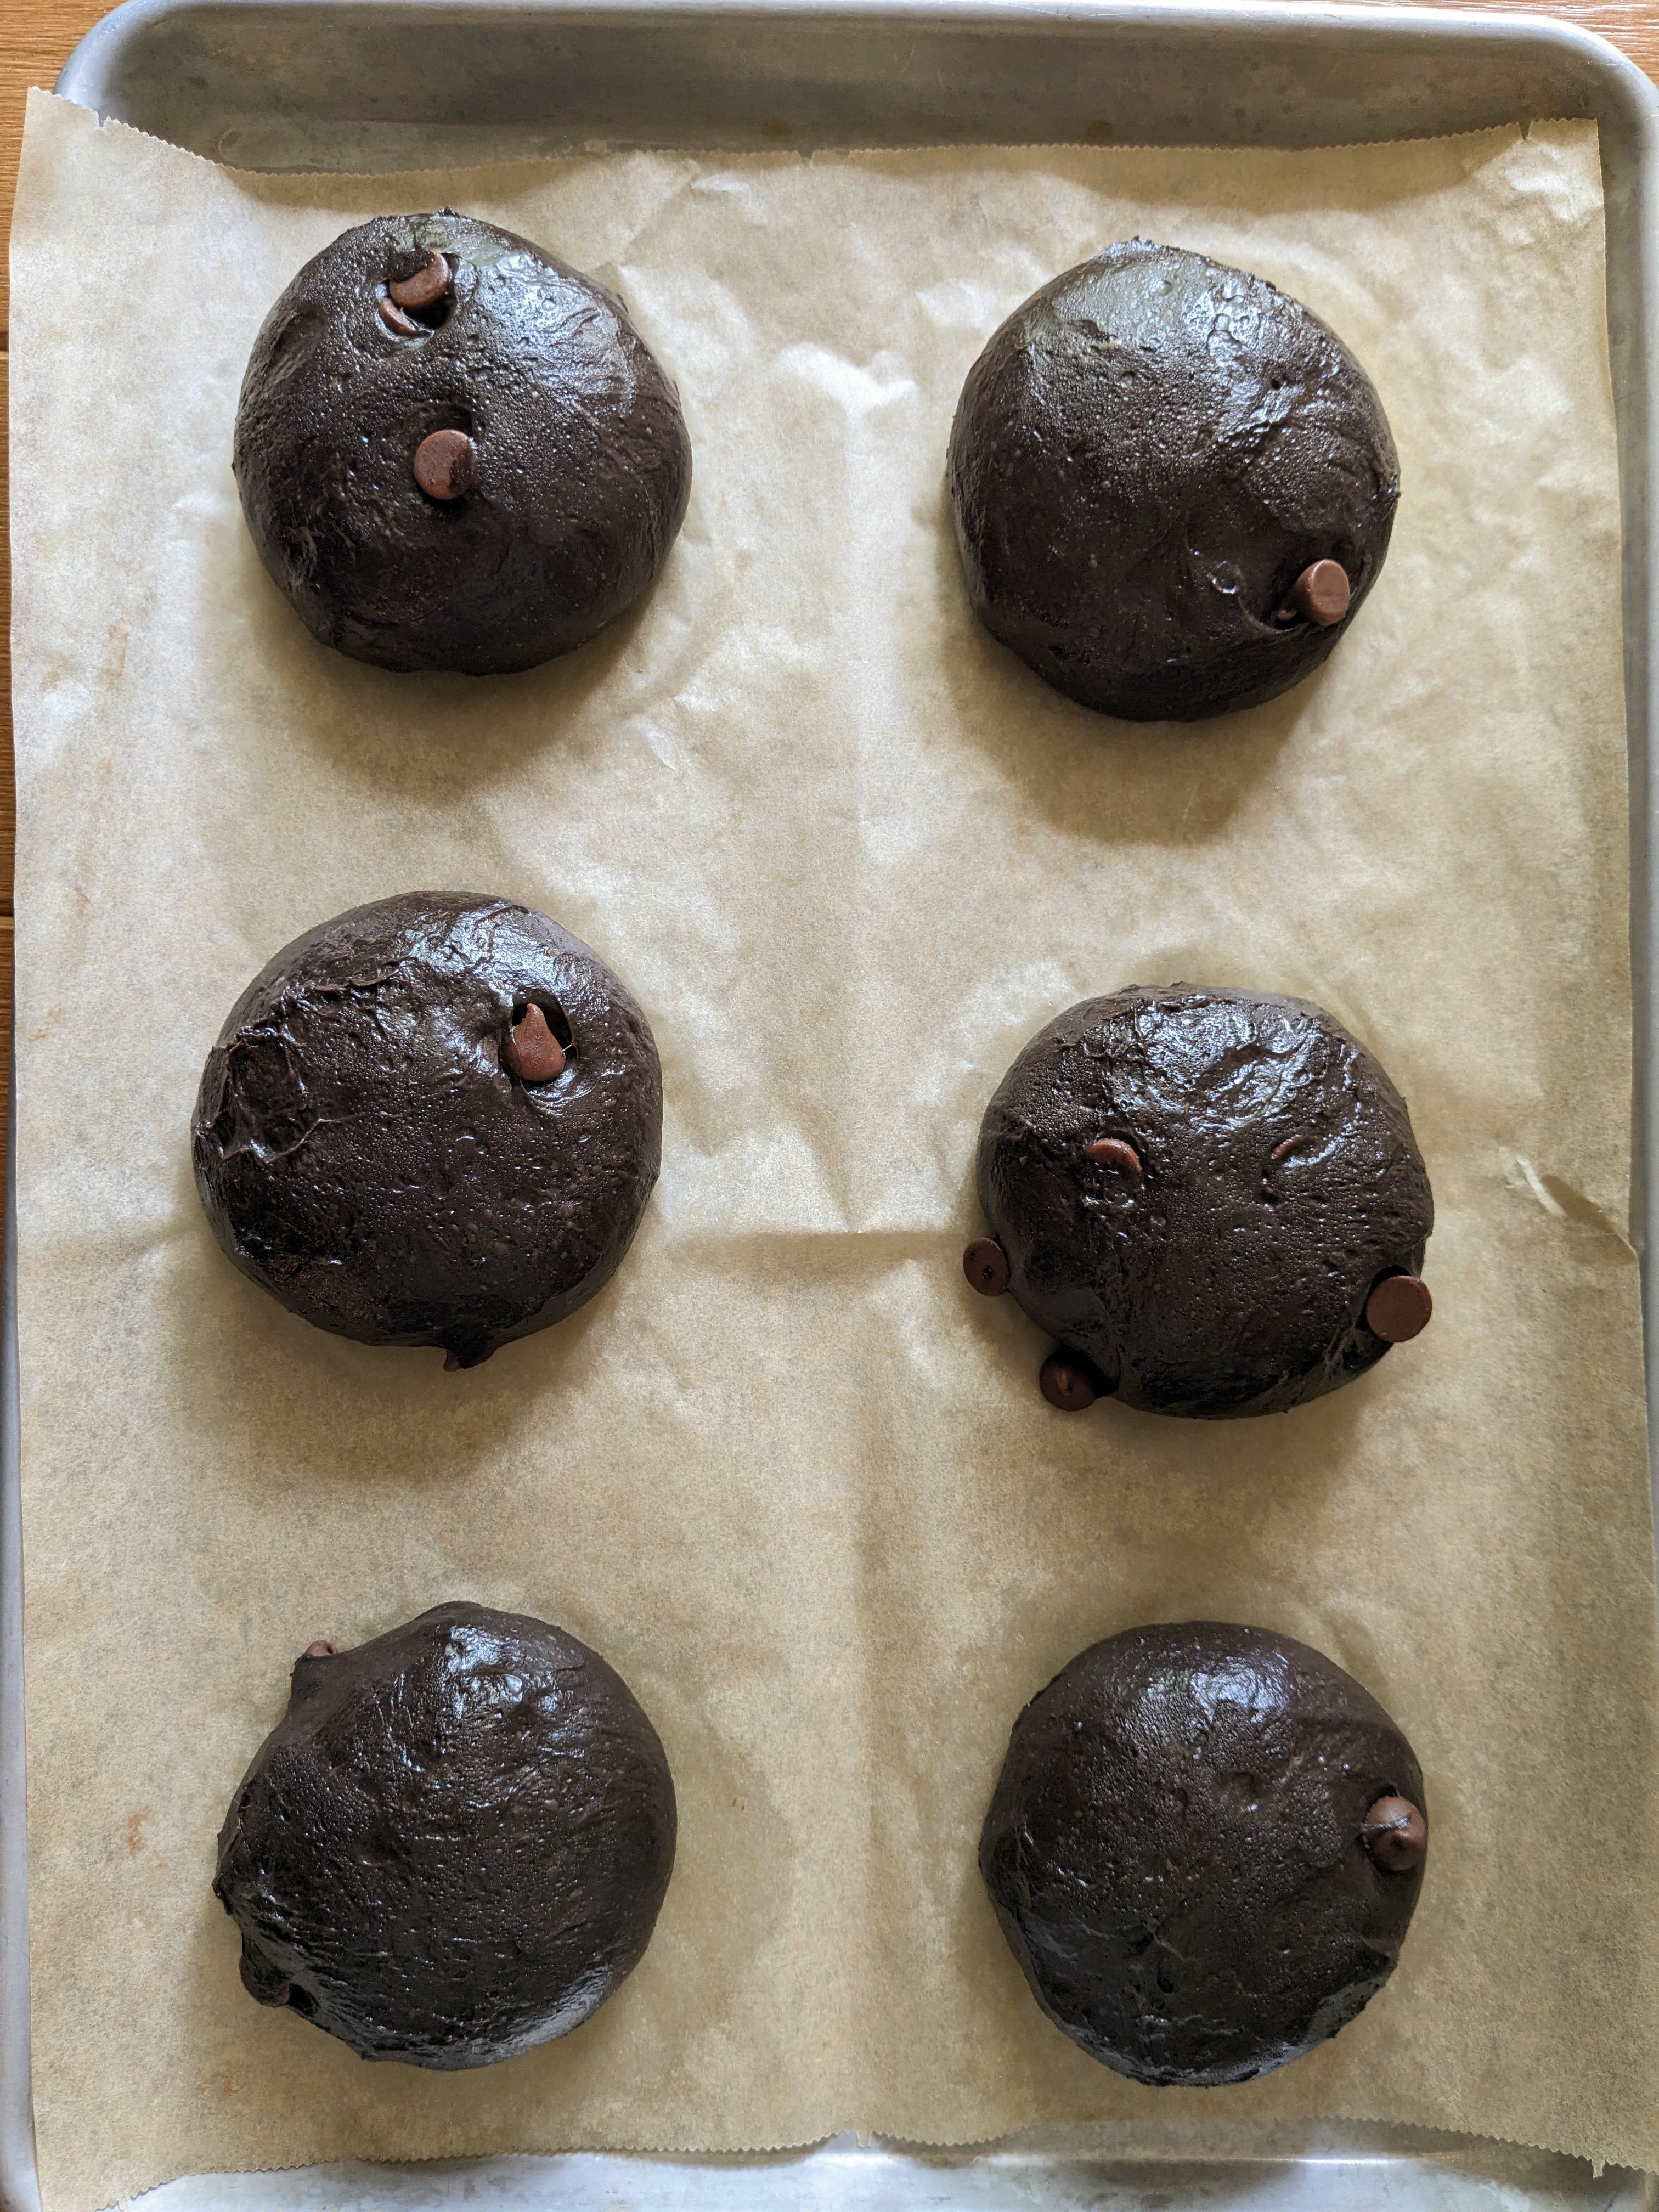
Add in the chocolate chips and allow the dough to knead on low speed until the chips have been evenly distributed.
Place the dough into a lightly oiled bowl and allow it to rise in a warm place for 1 to 1.5 hours, or until about doubled.
Press the air out of the dough and cover securely with plastic wrap. Place the baby dough into the fridge for 12 hours for an overnight proof. Goodnight.
Why an overnight chill? The betrayal!
An overnight rise in the fridge for this recipe is essential. Especially for a chocolate flavored dough - it’s like marinating the flavors, if that makes sense? The flavor not only intensifies due to prolonged fermentation, but the process for shaping the dough becomes easier since cold dough is much easier to work with. It also saves time, and allows you to have freshly baked conchas pretty early on in the morning if you prep the night before.
Could you also just whisper “Channey, shut the hell up” and bake the conchas the same day you prepared the dough? Yeah, sure.
Next Day: Shaping the Dough
Prepare and line two 13 x 18” sheet pans with parchment or silpats.
Lightly oil a clean surface or dough mat, and turn the cold concha dough out straight from the fridge, pressing the dough down gently to expel any air.
Cut the dough into 12-14 pieces, weighing roughly 90-95 grams each. Roll the pieces into balls and place them onto the sheet pans, seam side down. You can fit 6 dough balls onto each sheet (and here’s a demonstration video if you’ve never rolled dough before).
Tip: If you find your dough is sticky and difficult to shape, continuously oil your surface and hands to prevent sticking. Do not add any extra flour at this stage.

Cover the dough balls loosely and allow to come to room temperature and rise, about an hour and a half.
Prepare the Topping
To a bowl or stand mixer bowl, combine the shortening, flour and confectioners’ sugar. Combine using a rubber spatula or paddle attachment (on low speed).
If you are mixing by hand, you will eventually have to knead the mixture with your hands to achieve the correct consistency, which should be soft and smooth like cookie dough.
Add in the vanilla extract and massage the dough between your hands until thoroughly mixed.
Tip: Massaging the concha topping between your hands until soft and pliable brings it to an ideal temperature and texture for baking. It will help prevent major cracking, and the topping will remain smooth as it bakes. It’s science, I can’t really explain it but it works.
Separate the dough into two equal sized pieces, 200 grams each. Press your thumb into one of doughs to create a well, and add in the coffee powder. Massage the dough with your hands, using a sort of squish-together method (I know, so eloquent). Combine together until you can see little specks of coffee all throughout the dough.

Tip: To make instant coffee powder, you can use a pestle and mortar to crush instant coffee granules until their fine. This will also enhance the intensity of the coffee flavor, and allow it to mix into the topping dough easily compared to larger coffee granules.
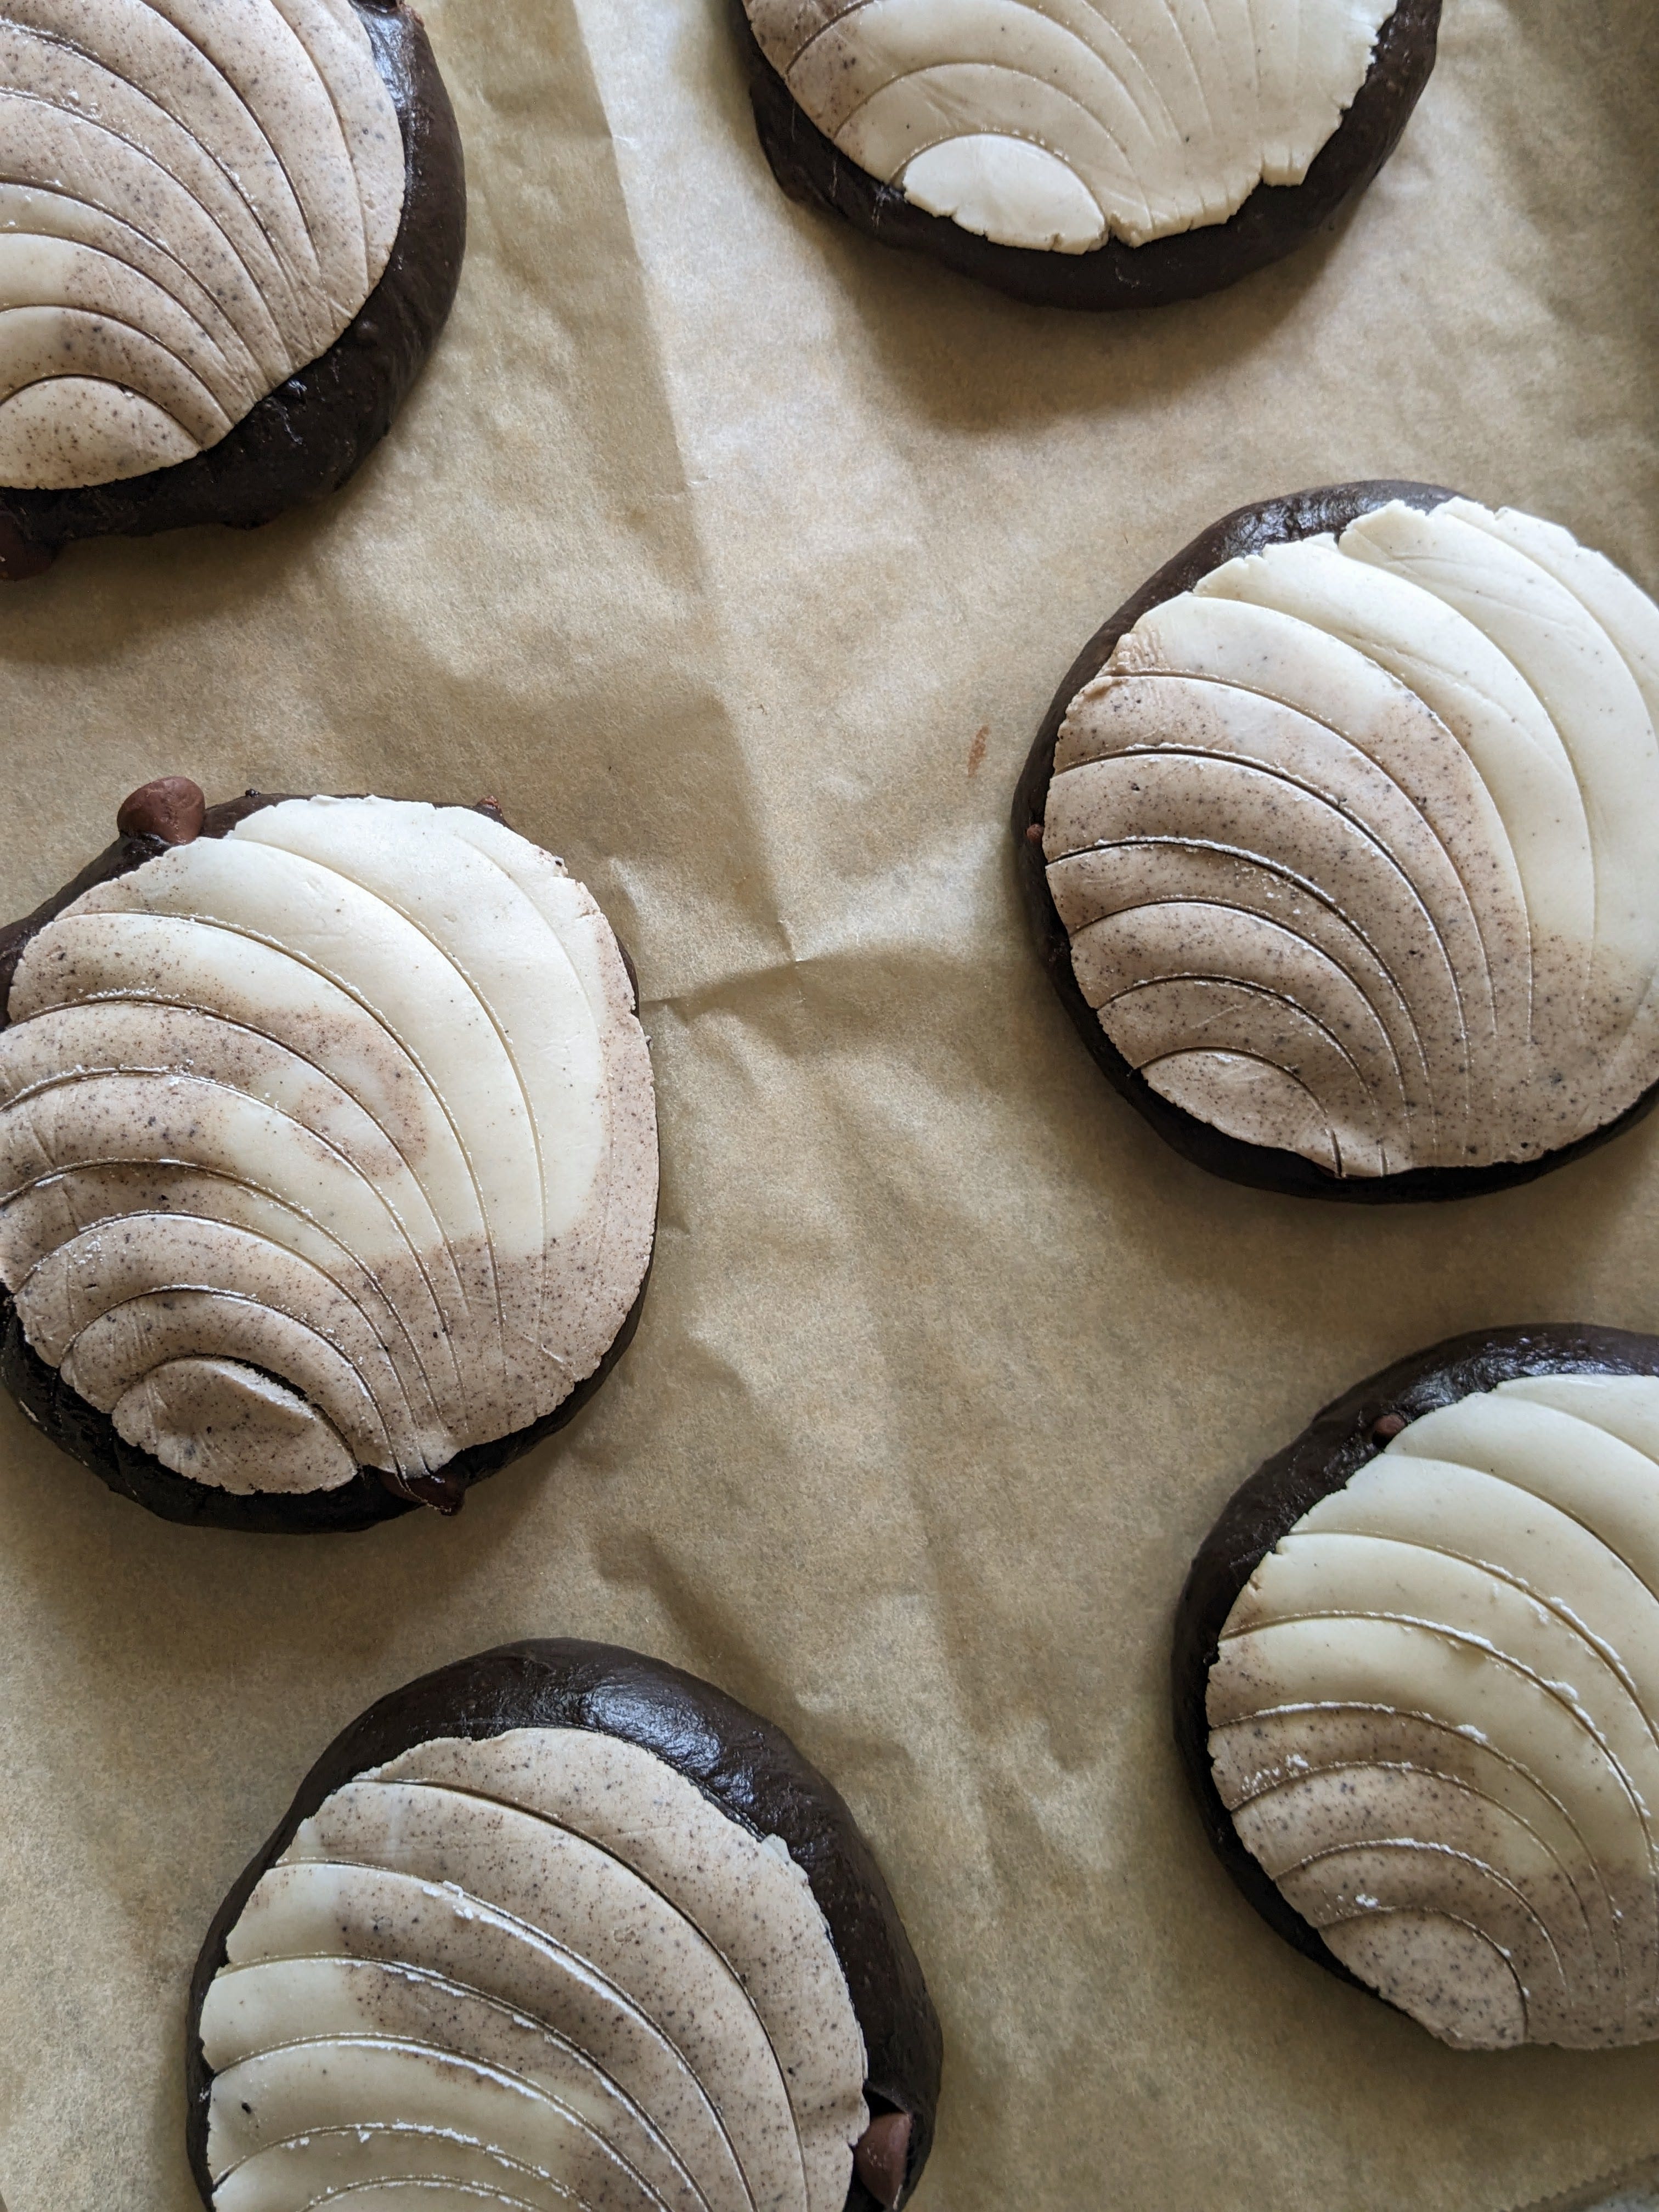
Separate both flavored doughs into 12 balls, making a total of 24 pieces. Take one of each flavor and combine together using your hands, rolling them between your palms gently until they swirl into one another. Repeat with all the remaining topping.


Assemble the Conchas
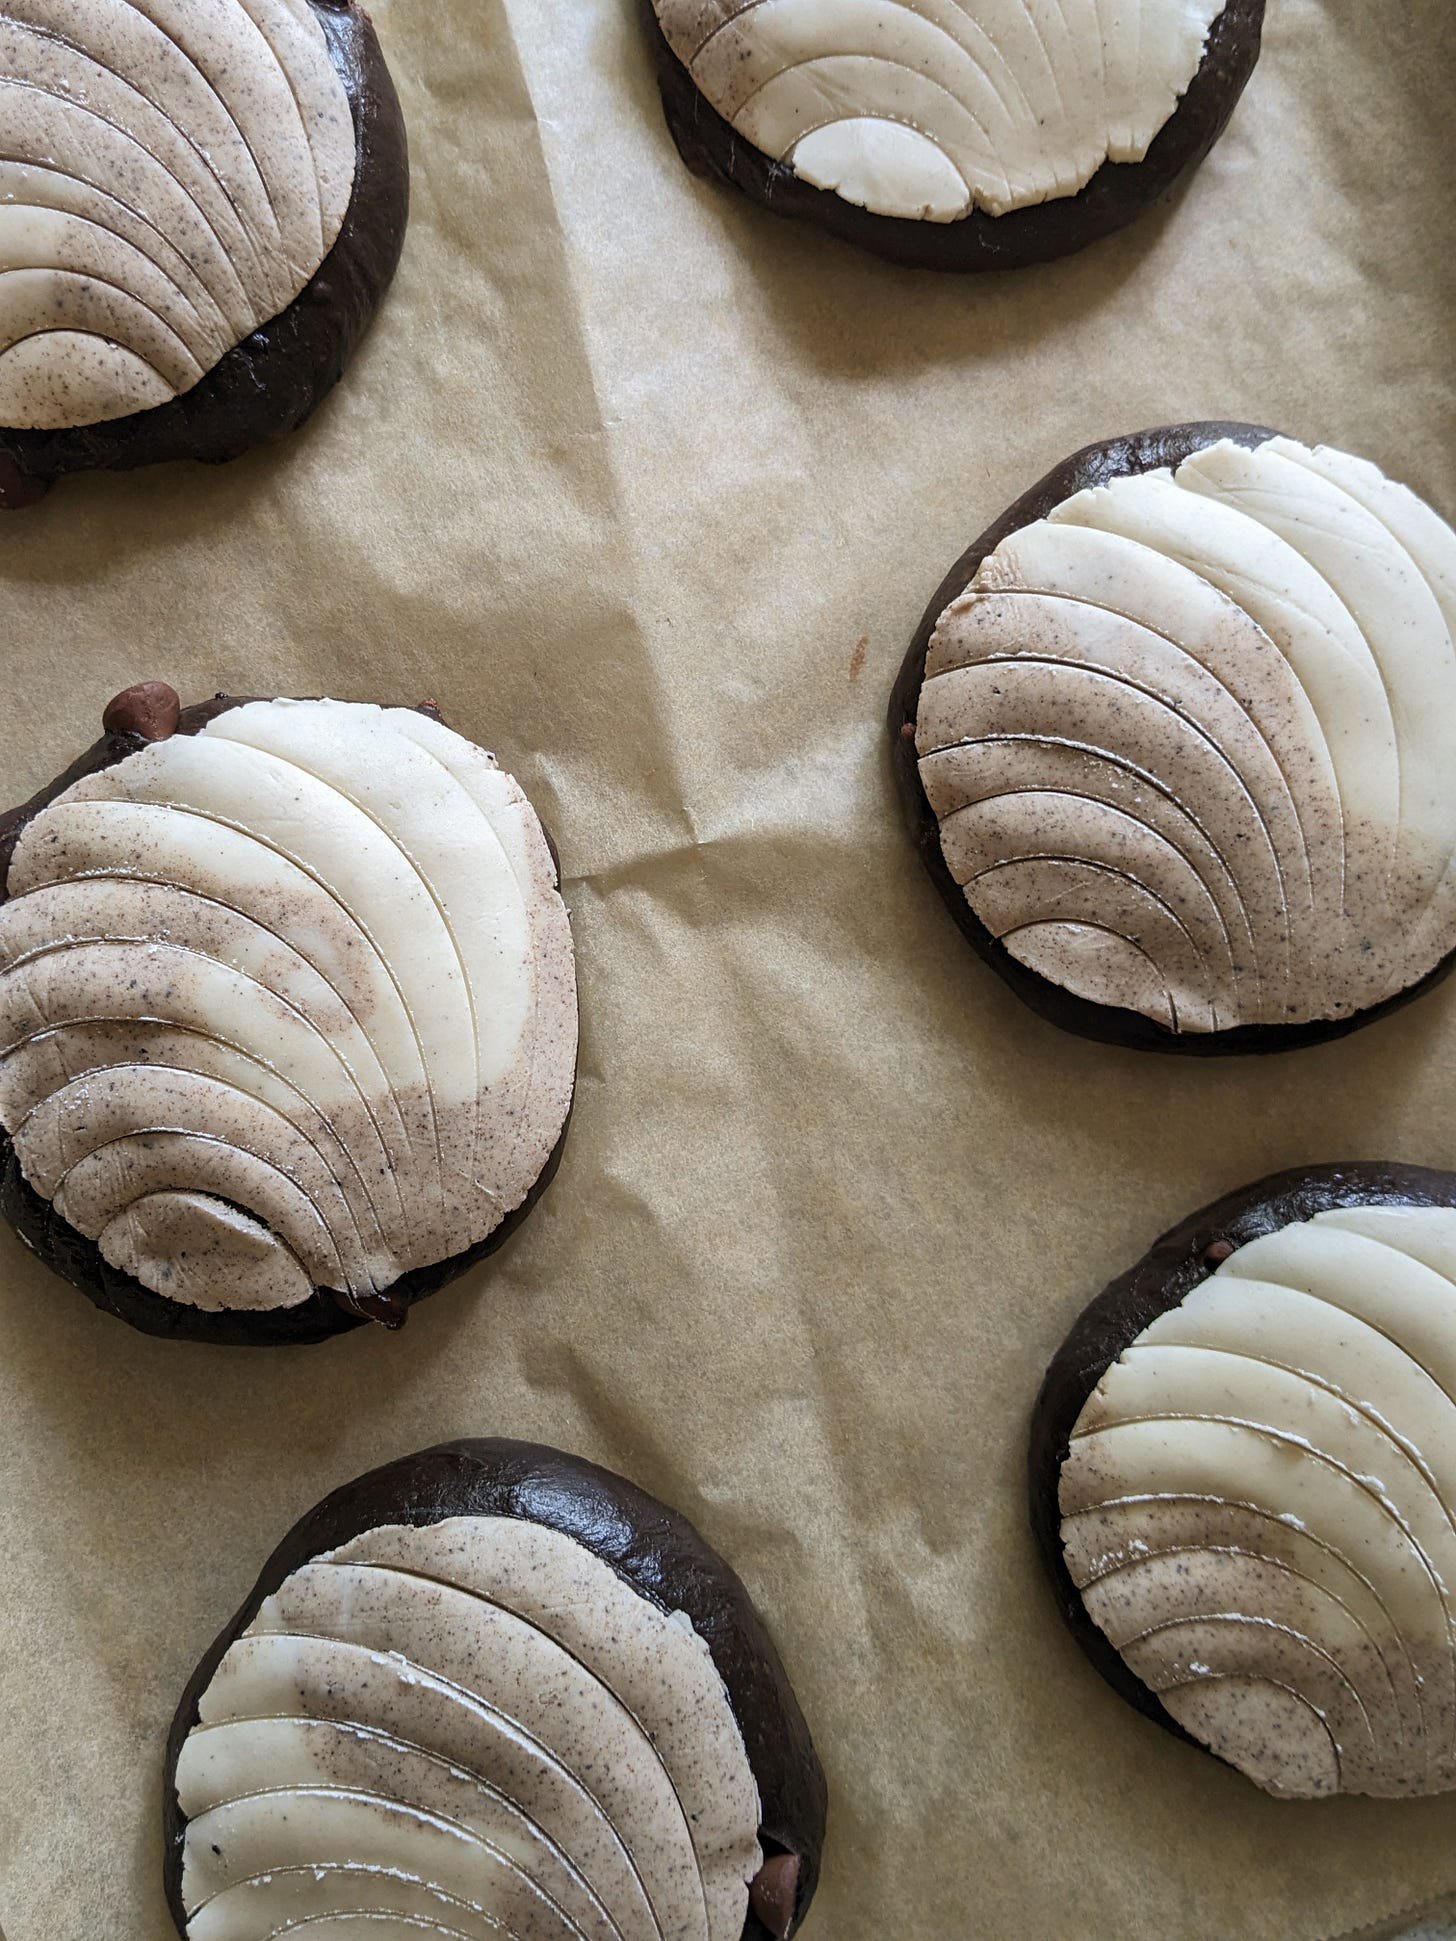
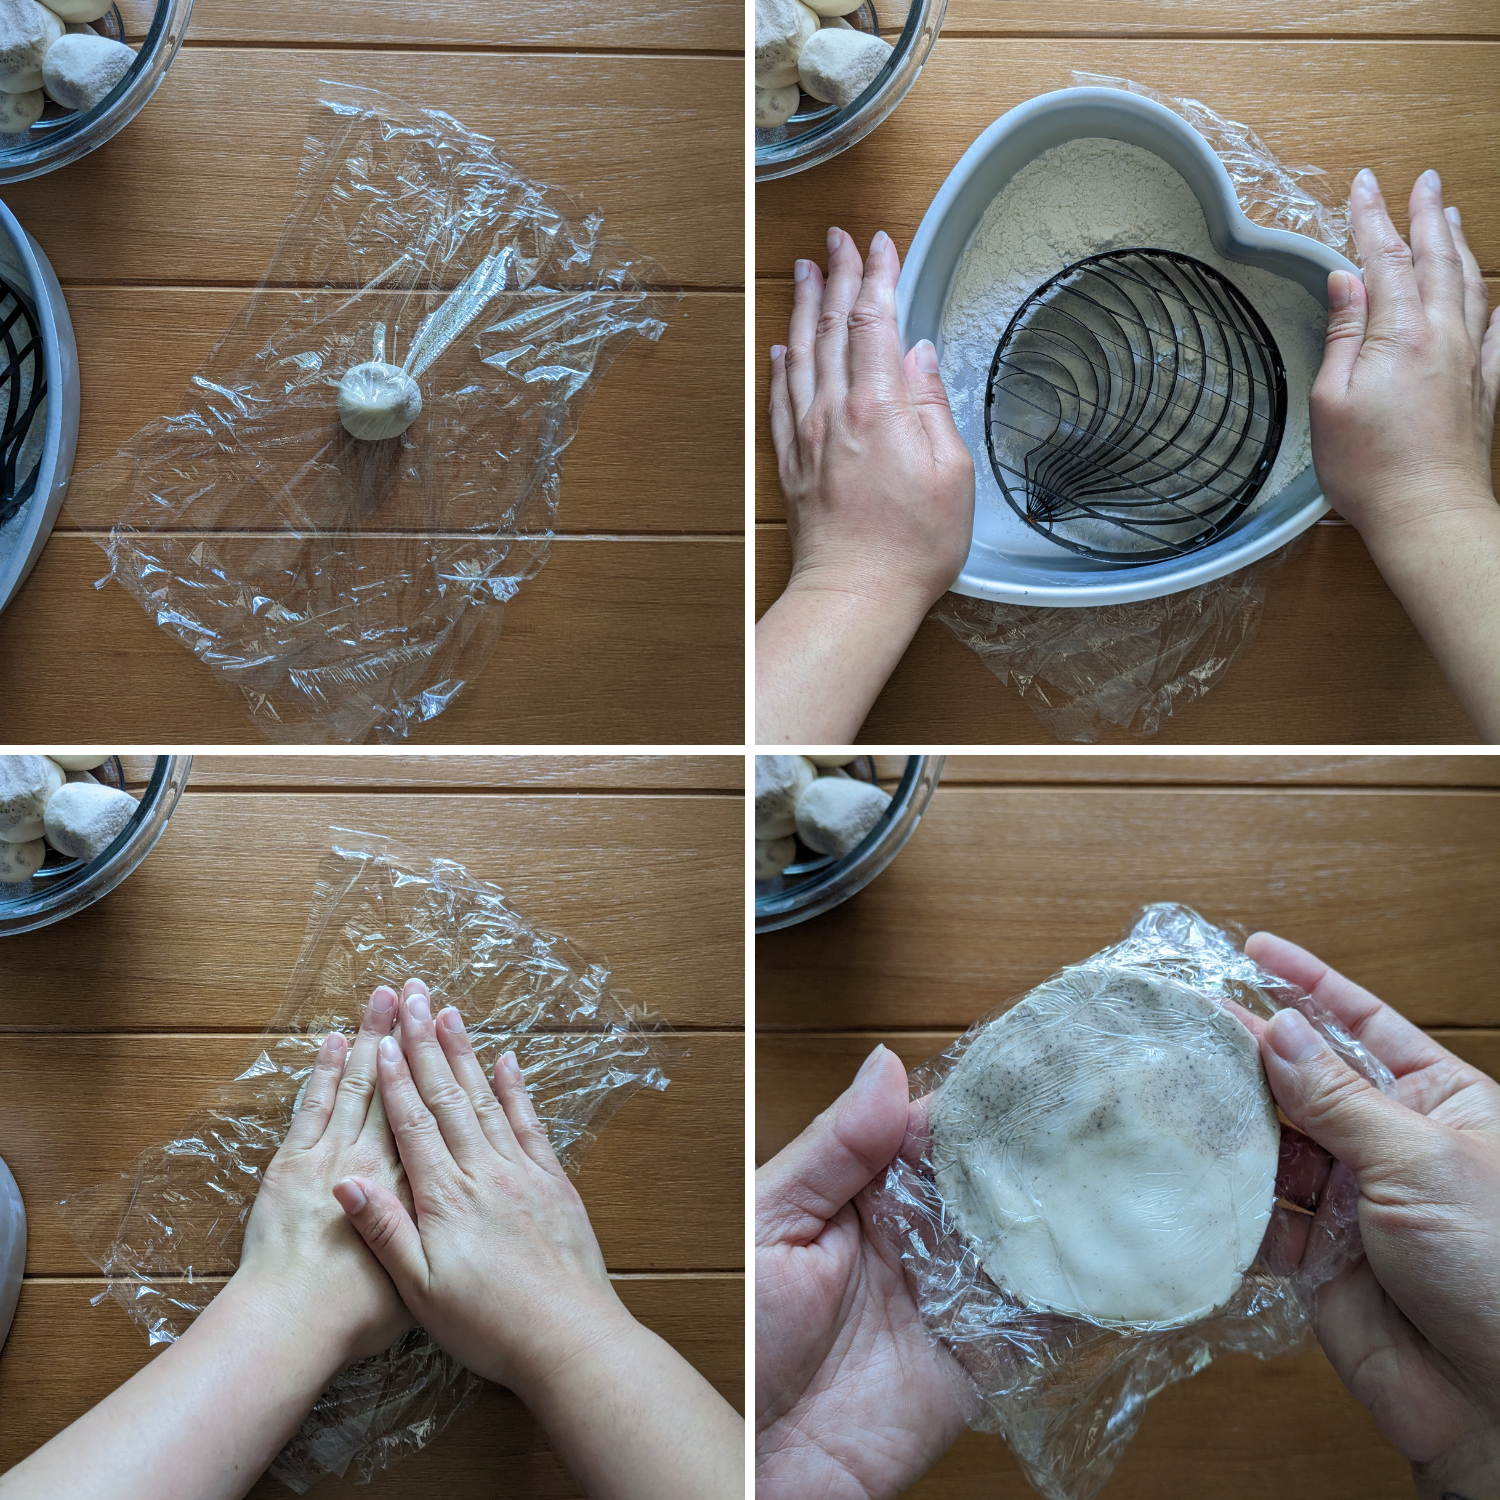
Flatten a piece of concha topping between two pieces of plastic wrap using either a cake pan, pie plate or tortilla press. I like to press down as firmly as I can, and then use my hands to flatten the topping out even more (should be roughly 4-4.5 inches in diameter and thin).

Gently remove the top layer of plastic wrap, and drape the topping onto the concha dough, pressing down onto the dough a little to secure it. Remove the remaining piece of plastic wrap from the concha.
Repeat this process until all the dough has been topped.

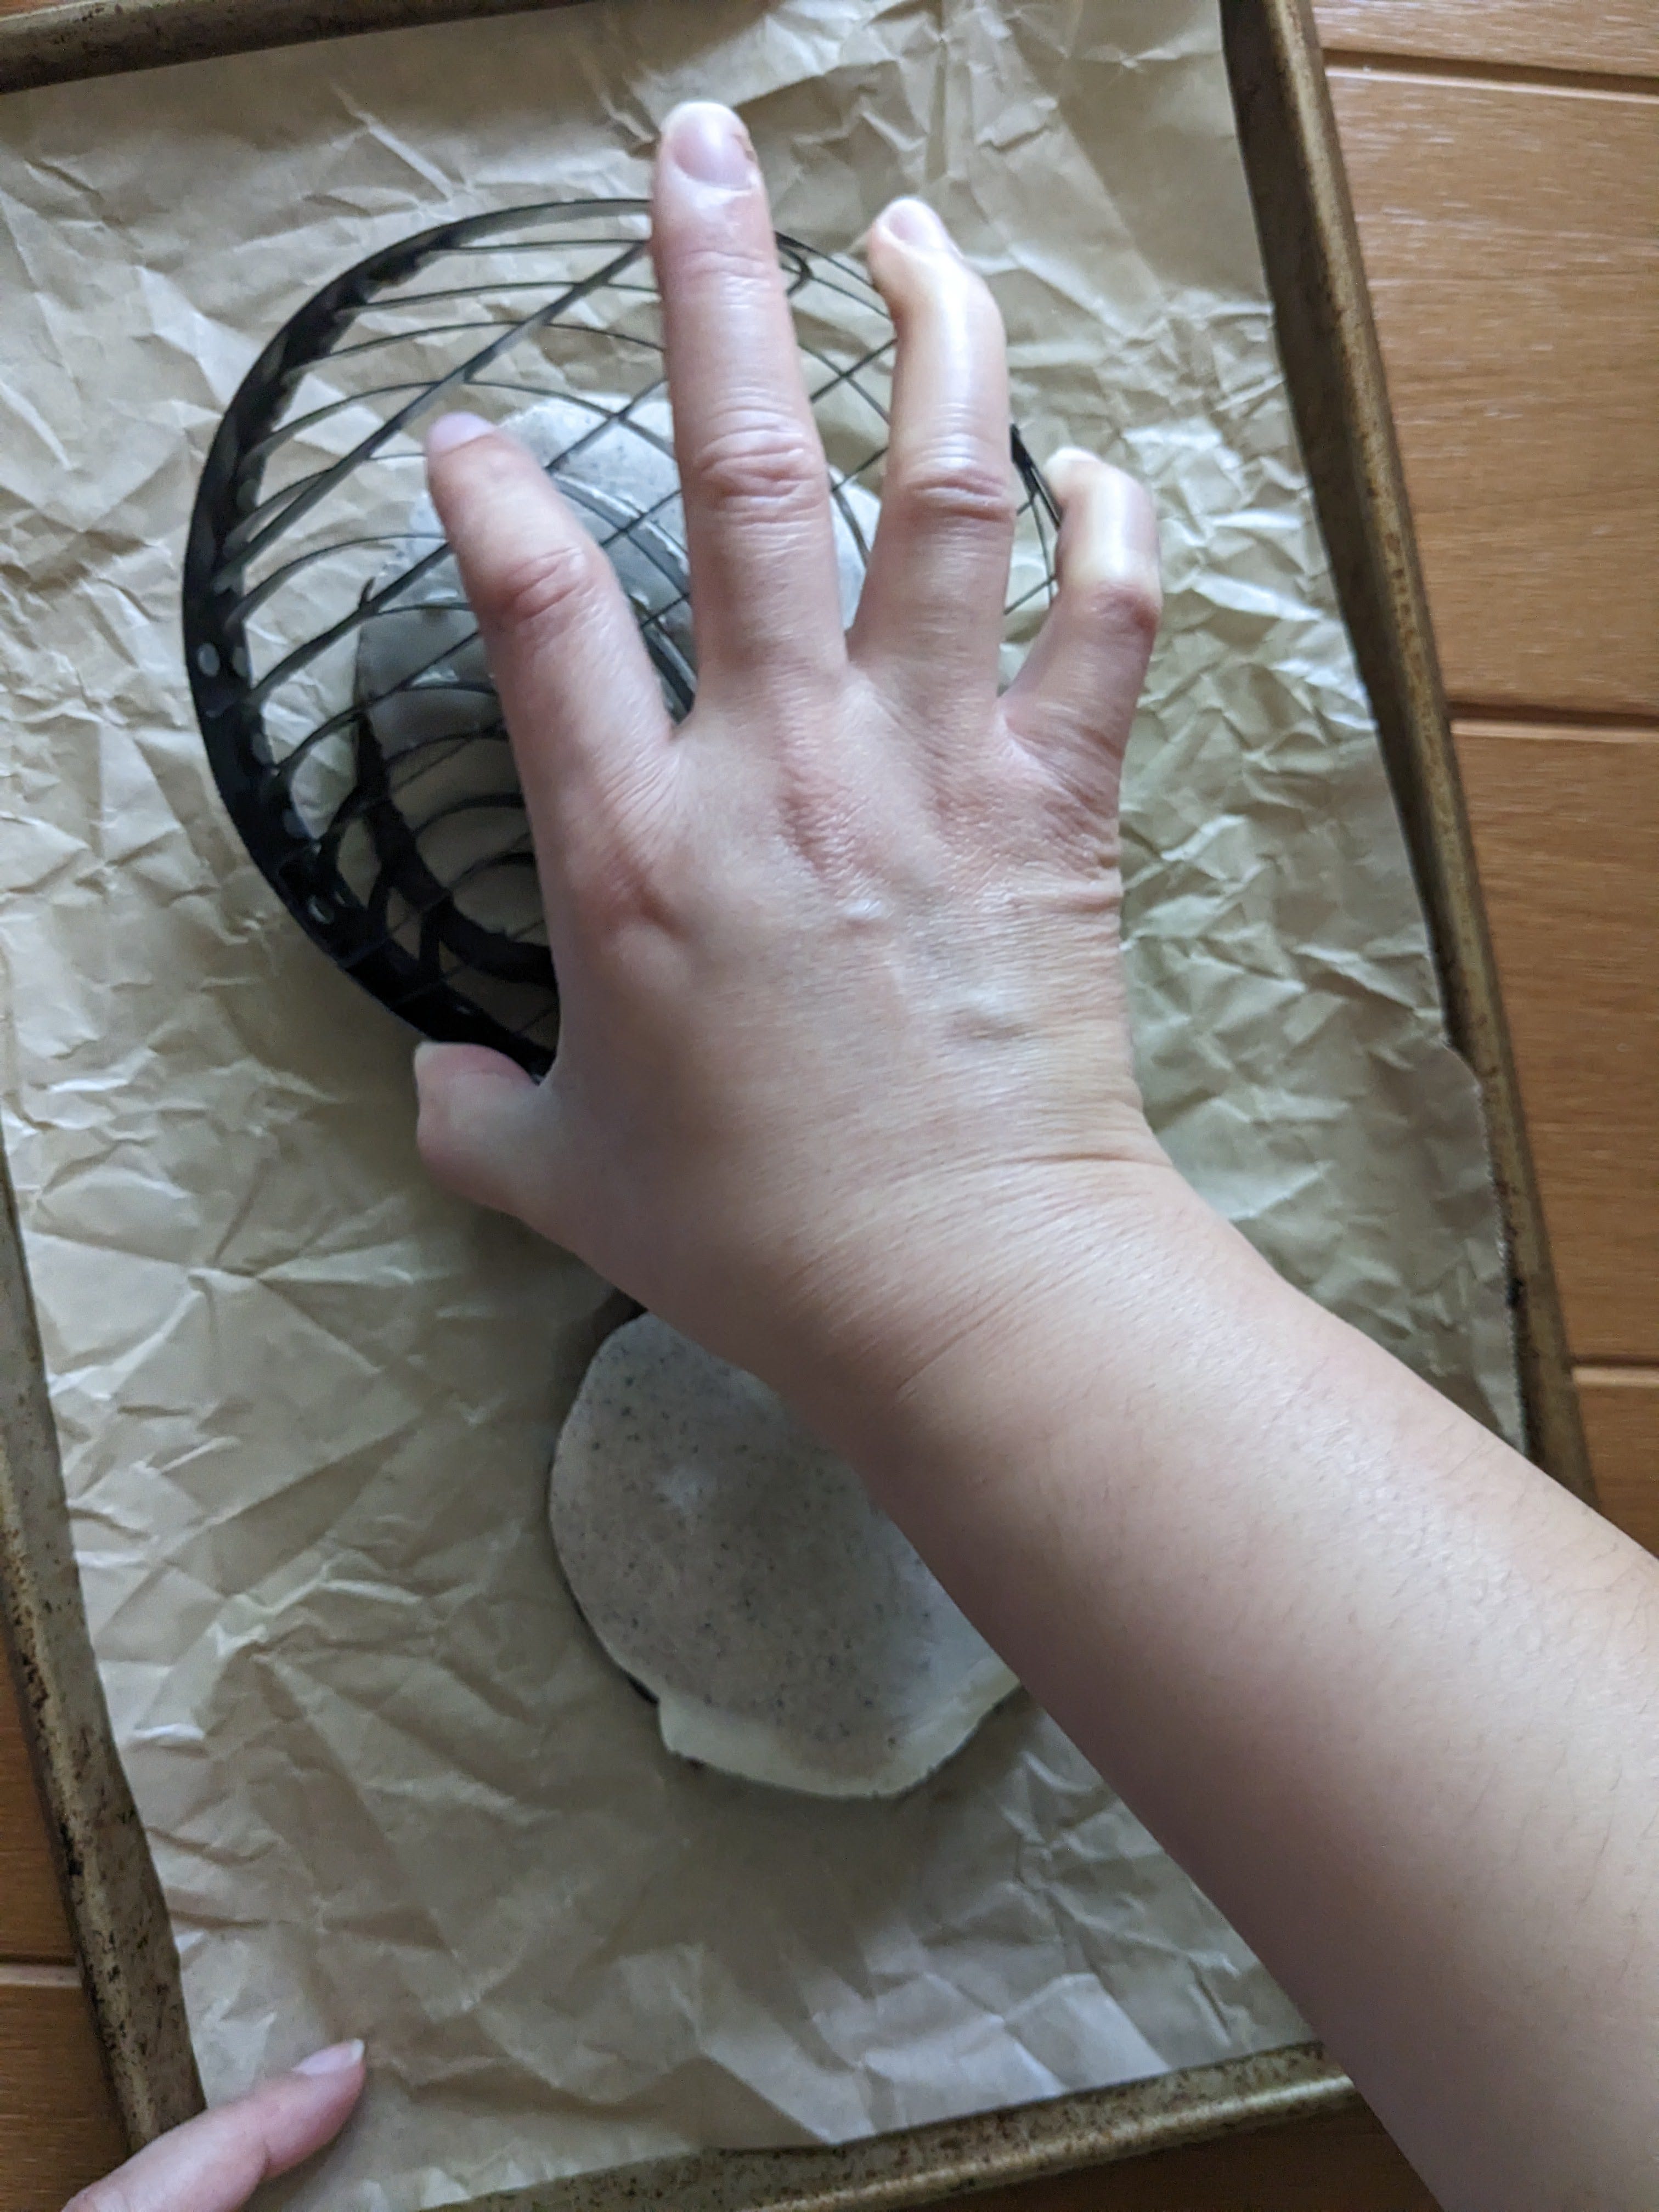
Using a concha stamp dipped in flour (or a smooth paring knife), score each concha with a seashell design. Be sure to not press too hard - only penetrate the topping, not the dough.

If using the paring knife method, create the first line at the center of the concha. Drag the knife from the top down gently, and taper it slightly as you approach the bottom (like the inner curve of a crescent moon).
Repeat 2-3 more lines on either side of the middle line, curving in the same direction.
Disclaimer: I did not design these by hand, my hands could never. That’s why I have a concha stamp lol. Once all the conchas have been scored, cover them again and allow them to rise for another 30 minutes. Preheat the oven to 325 F/165 C so they’re ready to go as soon as the 30 minutes is up.

Baking the Conchas
Bake each tray one at a time for a total of 24 minutes. Rotate the tray at the 12 minute mark for even baking and browning.
Allow the conchas to cool on a wire rack for about 15-20 minutes.

Prepare your coffee, put on a show or some music, dunk and enjoy. <3 The conchas will keep for a week, stored in a ziploc bag or wrapped in plastic wrap. I find the flavor becomes more prominent the following day after baking. It’s like a little bonus for all your hard work.
Thanks for reading. I hope y’all enjoy this recipe, and please consider subscribing for more.
THANK YOU. Channey <3


Hi! I am currently in the process of making these concha’s but when I took the dough out of the fridge it was quite firm is that normal?
Gonna make this tonight 😉. How much coffee do add the concha dough? You mentioned it but I don't see the amount 😊