


conchas: buttermilk & vanilla bean
A recipe for super soft and springy conchas, flavored with fresh vanilla bean and orange zest.


I was debating between sharing a recipe for these buttermilk conchas, or a recipe for black sesame, matcha and strawberry conchas. I went with the buttermilk first because they provide what I think is a solid base for conchas in general. The bread part of this recipe is versatile – I plan to tweak it for future recipes with other citrus flavors and spices, but the texture is so soft and spongy. You need to use bread flour for this recipe, otherwise the texture will not be quite right. Bread flour provides a slight bite/chew, and has the ability to stand up well to all the moisture that is added (buttermilk, salted butter and whole eggs).
I also learned that you can absolutely sub in buttermilk for any of my concha recipes. The buttermilk is so enriching and flavorful, it keeps the bread tender and soft for up to a week (while loosely wrapped in plastic).
When I was developing this recipe, I wanted to use simple, yet effective flavors. When I think of buttermilk, the first thing that comes to my mind is cake. And the two flavors that follow are chocolate + buttermilk, and vanilla bean + buttermilk. I’m not really a white cake person, but I do love a classic, tangy buttermilk white cake with little vanilla bean specks. So yeah, a soft, tender, tall and spongy vanilla bean concha just sounded really damn good. Vanilla bean also pairs well with anything, it’s angelic (and aesthetically it looks great in the concha crust).
For the bread, a bit of orange zest and a touch of Ceylon cinnamon (not enough for a prominent flavor – just enough to hype up the orange) work together for a well-rounded, light and citrusy profile.
I do think these conchas would be delicious with either a cocoa or strawberry crust as well (I actually sprinkled a bit of strawberry sugar onto one straight out of the oven and it was heaven).
The album I had on while making these? No Doubt’s Tragic Kingdom. The oranges make me miss SoCal so much, lol.

P.S. I am including cup measurements for this recipe. I don’t recommend making conchas (or any type of bread) without a scale. I’m not going to yell at you for not using a scale, but please note not all of my recipes will include conversions.
BUTTERMILK & VANILLA BEAN CONCHA RECIPE
Makes: 12 Conchas | Prep Time: 1 hour | Resting Time: 3-ish hours | Chill Time: 12 hours (optional) | Cook Time: 48 minutes
concha dough
500 grams bread flour (3 ¾ cups, scooped and leveled)
30 grams milk powder (4 tablespoons; may omit but please use if you can)
25 grams piloncillo or light brown sugar (2 tablespoons)
25 grams cane sugar (2 tablespoons; can use granulated)
1 teaspoon sea or kosher salt
1 teaspoon Ceylon cinnamon (can use whatever cinnamon also)
30 grams water (1 oz; warmed to 100-110 F/40-45 C)
½ teaspoon honey or sugar (added to water)
10 grams active dry yeast (1 tablespoon)
240 grams buttermilk (8 ounces)
3 large eggs 150 grams
113 grams salted butter, cold and cubed (½ cup)
zest of 1 navel orange
concha topping
135 grams confectioners’ sugar (about 1 ¼ cup, spooned and leveled)
135 grams all-purpose flour (1 cup, spooned and leveled; may sub with bread flour)
135 grams shortening (¾ cup)
1 vanilla bean, scraped
pinch of sea or kosher salt
SPECIAL EQUIPMENT
1 stand mixer w/ dough hook attachment
INSTRUCTIONS
Prepare the Concha Dough
Heat the water and honey until warm to the touch (between 100-110 F/40-45 C). Sprinkle the yeast over the water and mix until just combined. Set aside to activate.
To the bowl of a stand mixer, combine the flour, milk powder, sugars, salt, and cinnamon. Use a whisk to combine, and make a well at the center of the flour using your hand.
To the well, add the buttermilk, eggs, orange zest and yeast mixture. Use a rubber spatula to combine everything together until a shaggy dough begins to form.
Attach the bowl to the stand mixer, and begin kneading on low speed. Allow the dough to knead for about 10 minutes until it becomes stretchy and gluten formation begins.
After 10 minutes, and add in all the cold, cubed salted butter at once.
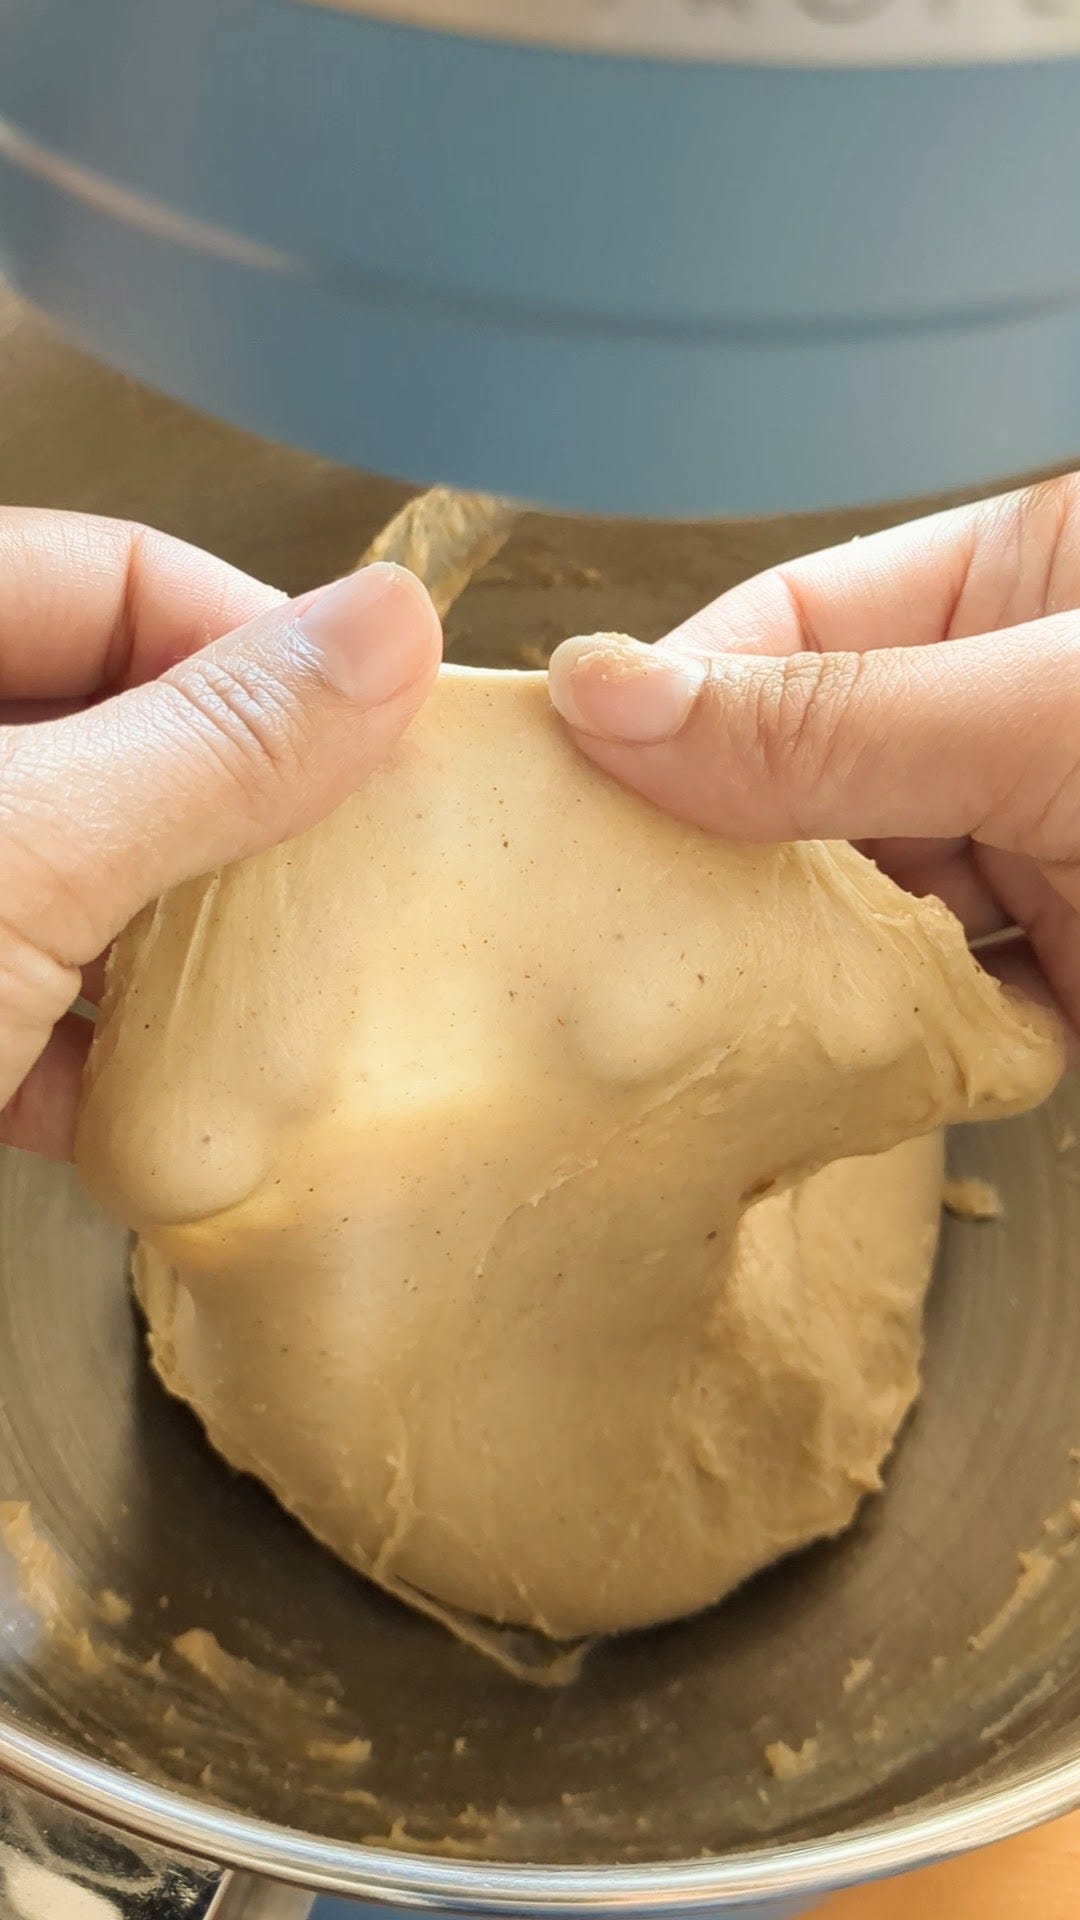
Turn the mixer speed up to medium high. Allow the dough to knead until it’s pulling away from the sides (this usually takes me between 20-30 minutes, just set a timer and walk away).
The dough is ready when the sides of the bowl are clean. The dough will be soft, supple and stretchy. Gently pull the dough and see how thin it stretches for you (we want a super thin film of dough). If it rips immediately, continue kneading and test again in 5 minutes.

Form the dough into a ball and place it into a large, lightly oiled bowl. Cover the bowl with a tea towel or plastic wrap, and allow the dough to rise for 2 hours.
To Overnight Chill, or to Not Overnight Chill
Choose your own adventure! After the conchas have risen, you have the choice to continue on with baking them that day, or knocking out the air and placing them into the fridge for a 12 hour (or overnight) rise.
Pros: An overnight rise will not only improve the flavor of the dough; (allowing the buttermilk and orange zest to mingle) it will also become much more firm and easier to handle when rolling and shaping.
Cons: You have to wait 12 hours.
It’s your choice! If you want conchas for breakfast, I recommend prepping the dough the night before, letting it rise in the fridge, and then shaping and assembling the conchas for an early bake the next morning.
Shaping the Dough
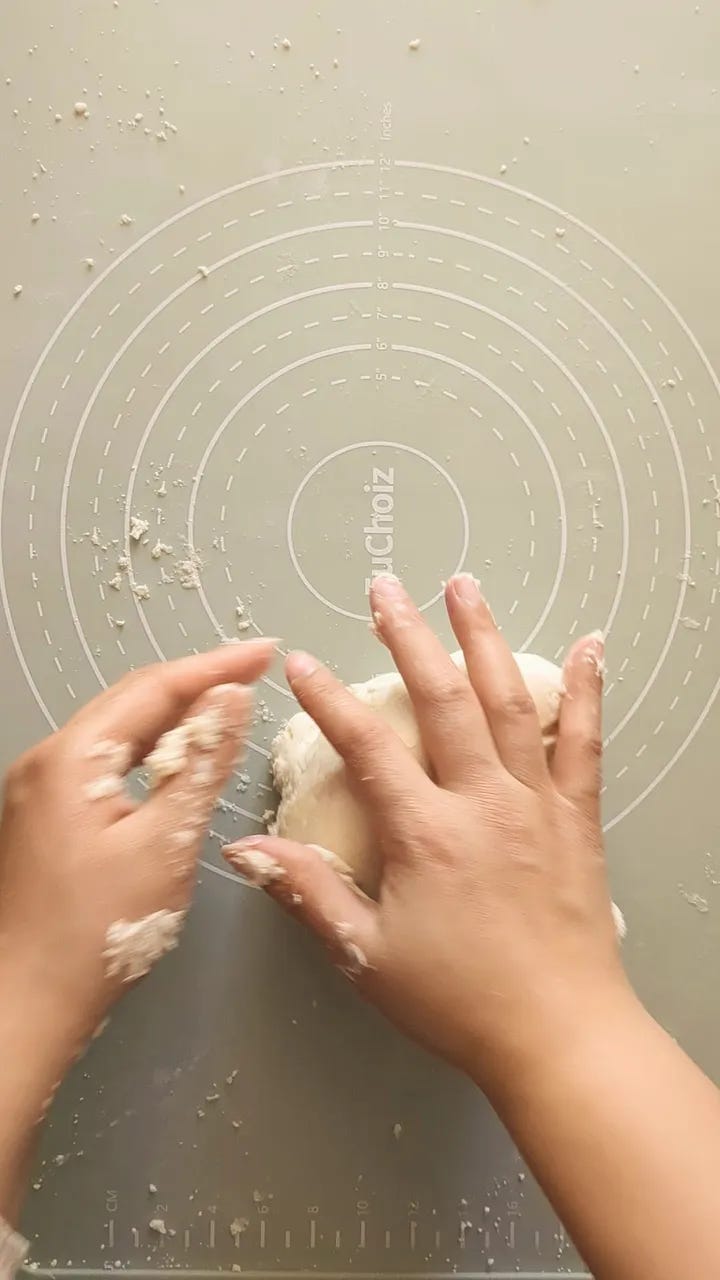
Turn the risen dough out onto a clean surface or baking mat. To prevent sticking, lightly oil your hands and surface (add more as necessary). Use your hands to gently push the air out of the dough.
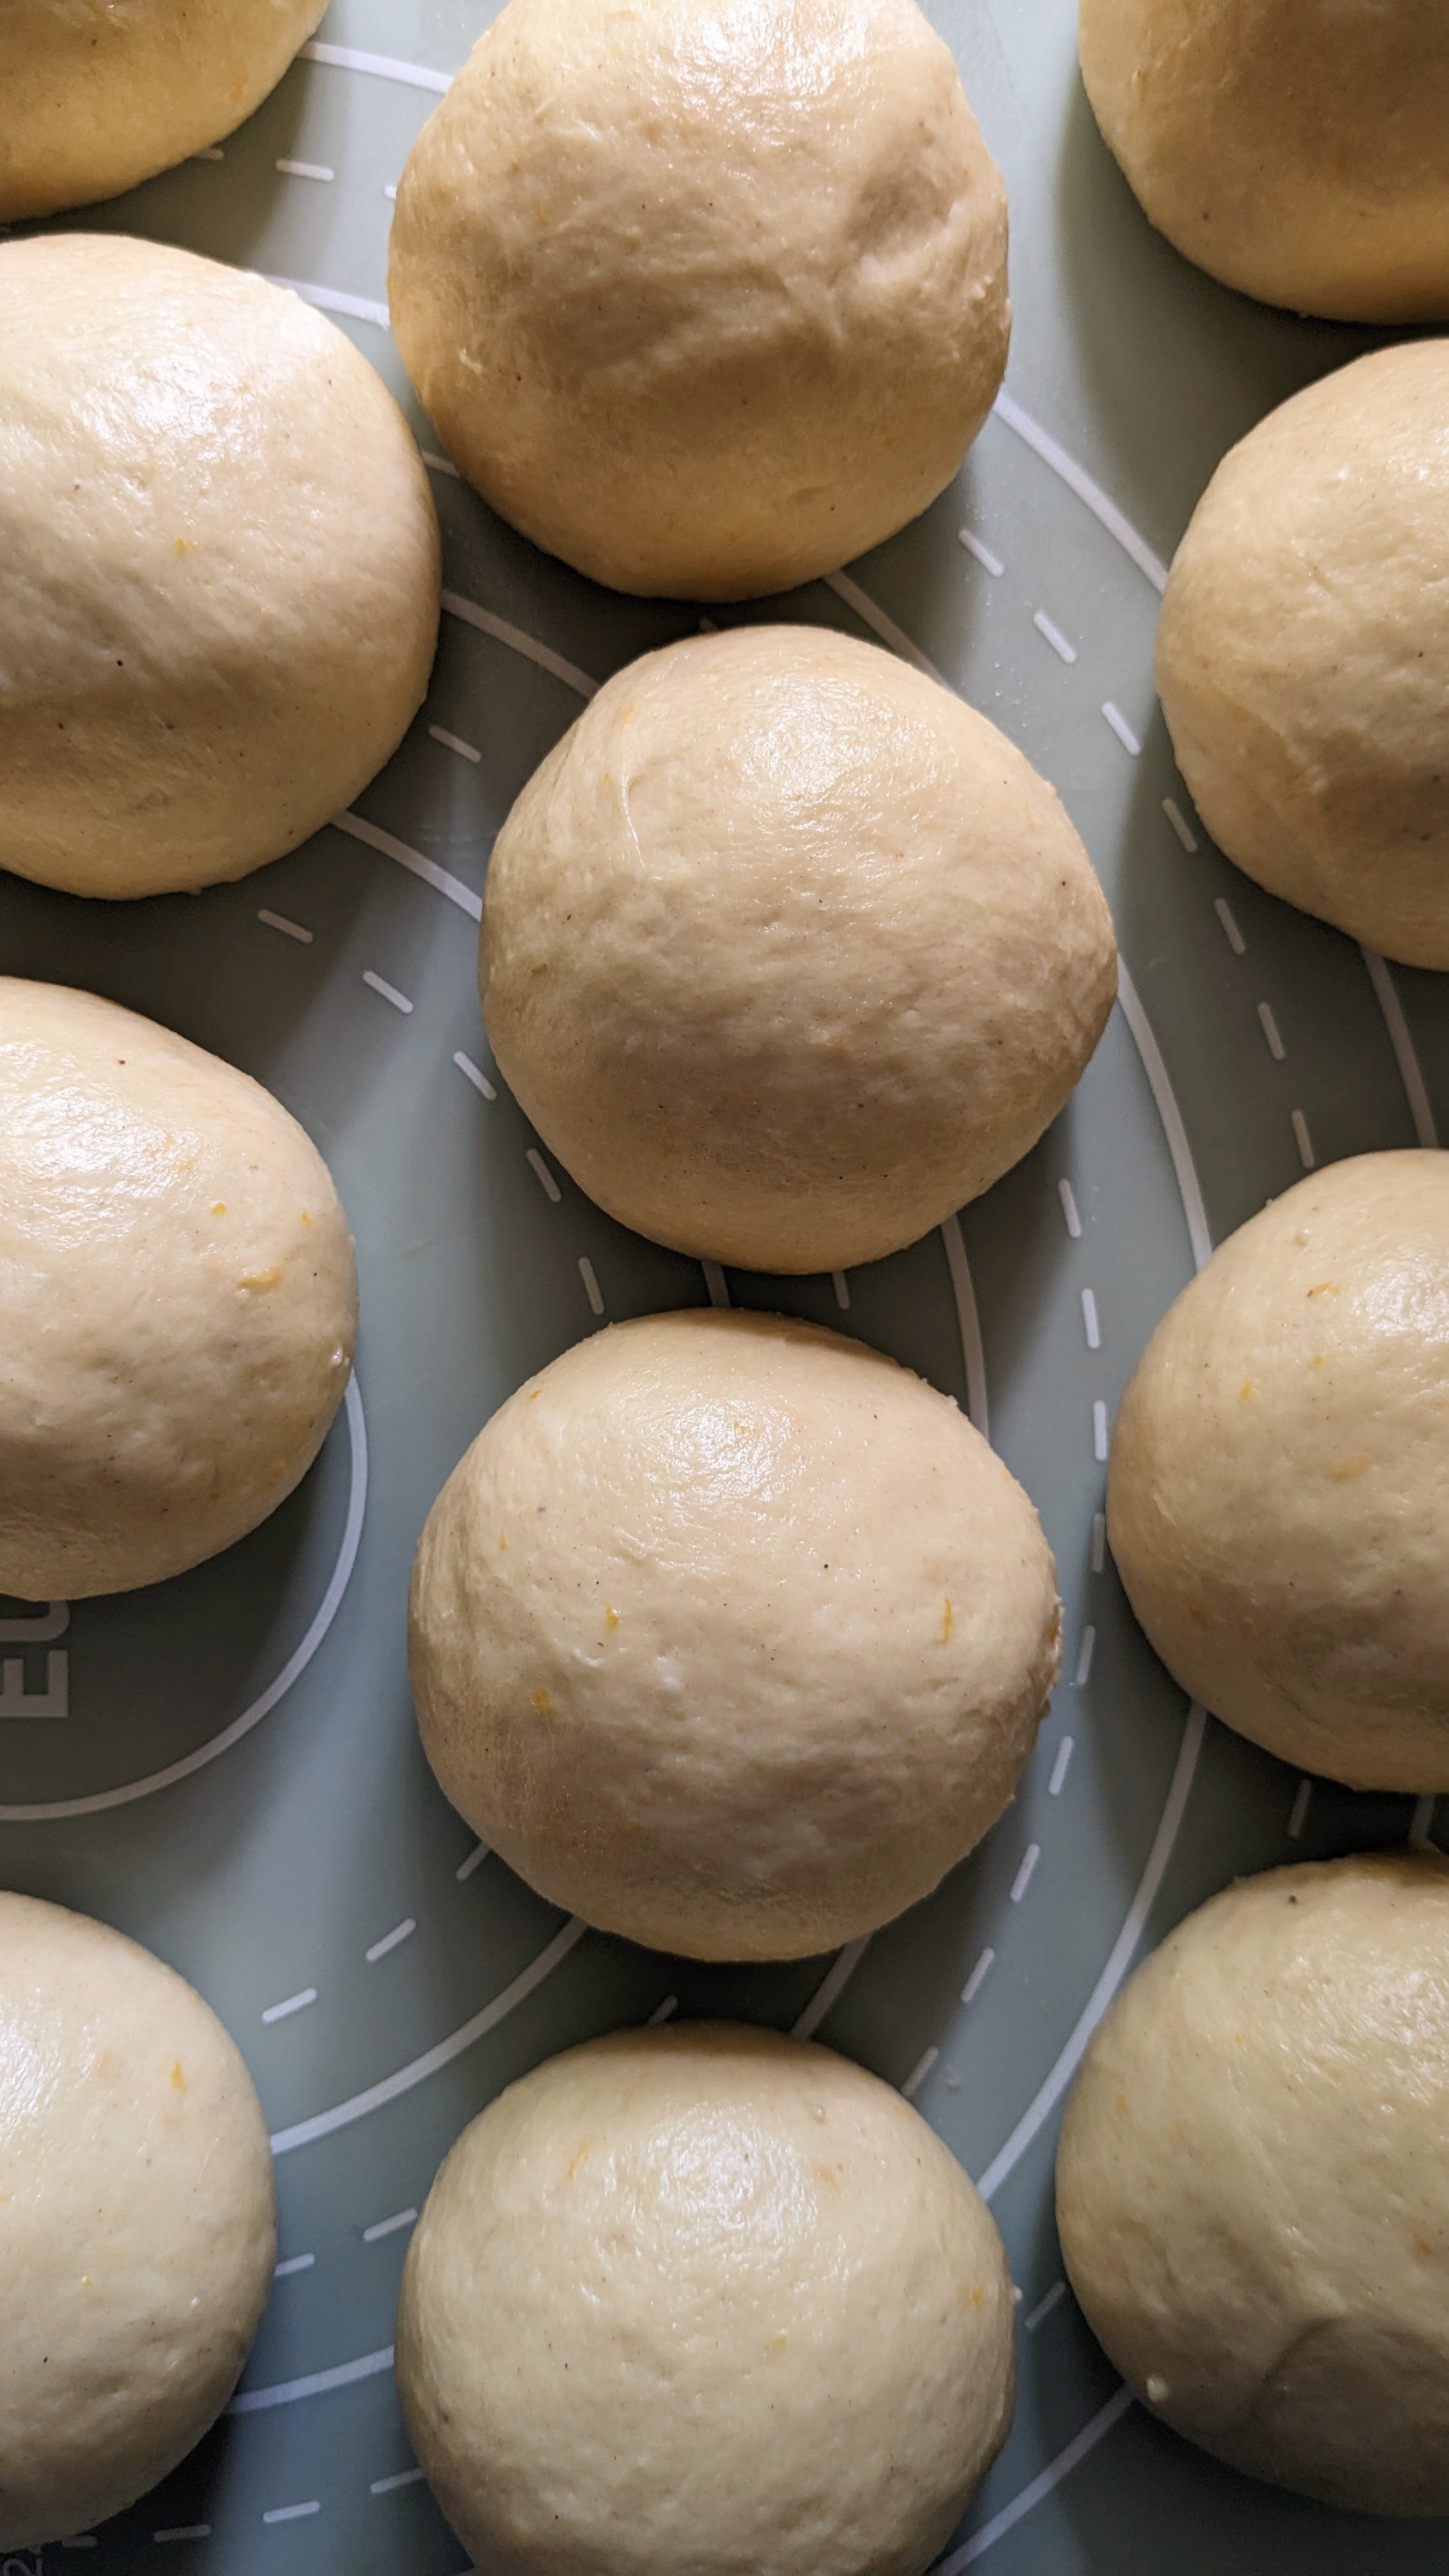
Cut the dough into 12 pieces, weighing 90-95 grams each.
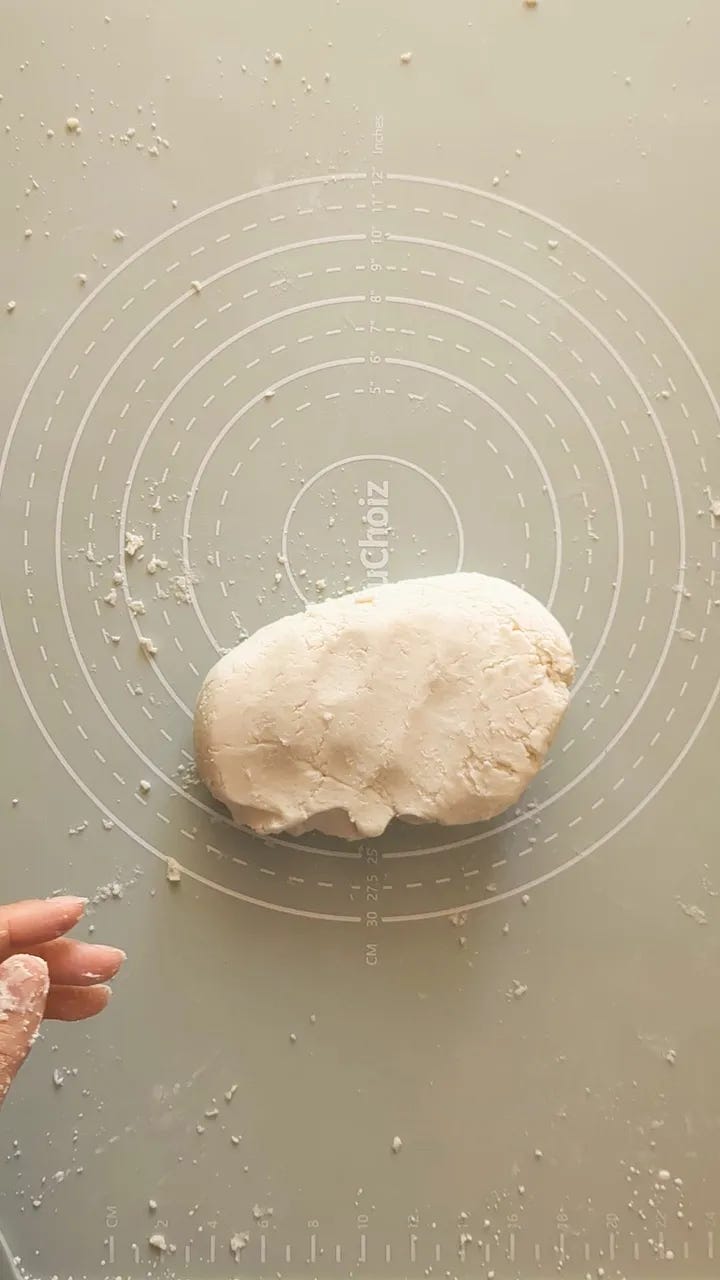
Form each piece of dough into a ball by pinching the bottom together and placing the pinched side down onto your surface.
Cup your hand over the dough (gently adding pressure with your palm) and rotate your hand in a circular motion. You should feel the dough roll while your fingers keep it in place.
Repeat until each ball is shaped, and place them onto two 13 x 18” baking sheets lined with parchment, 6 dough balls per sheet.
Cover with plastic wrap, and allow to rise while preparing the concha topping. If your conchas went through a chilled overnight rise, allow them at least an hour to come back up to room temperature.
Prepare the Topping
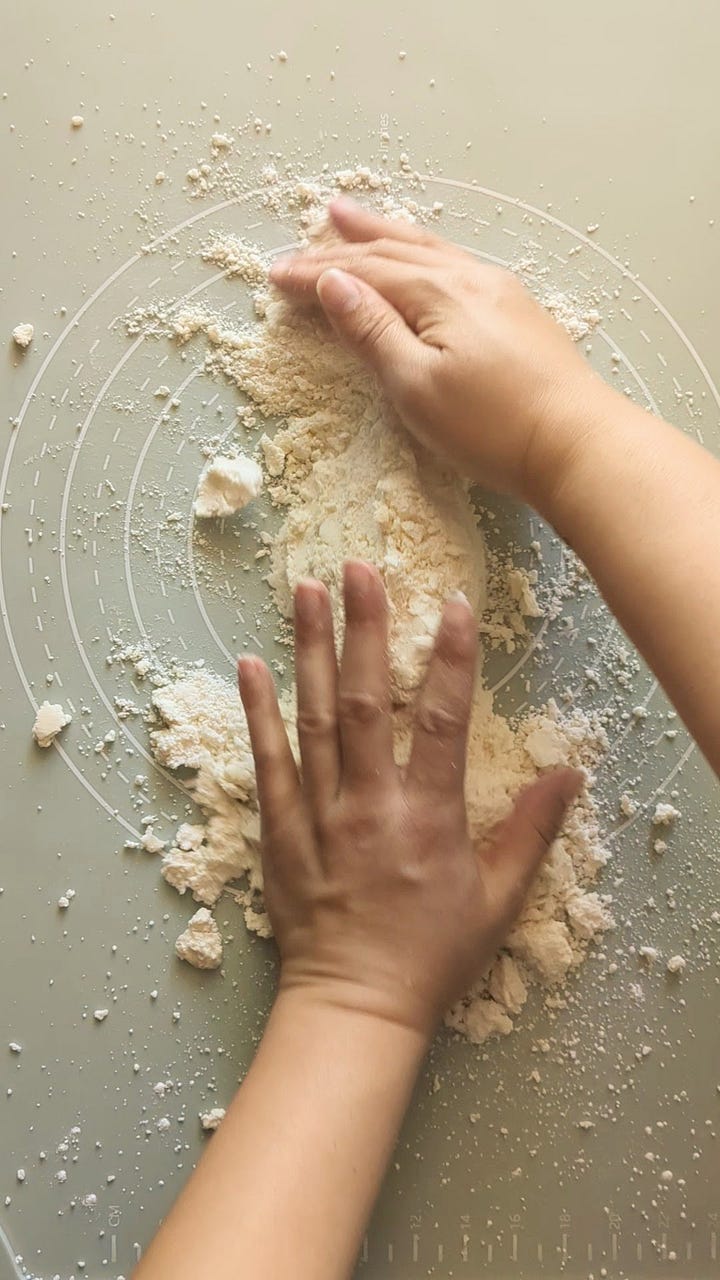
To a medium bowl, combine the flour and confectioners’ sugar. Use a whisk to combine the ingredients and loosen up any clumps.
Add the shortening, and use a rubber spatula or wooden spoon to press the shortening into the dry mix until a sandy, crumbly mixture forms.
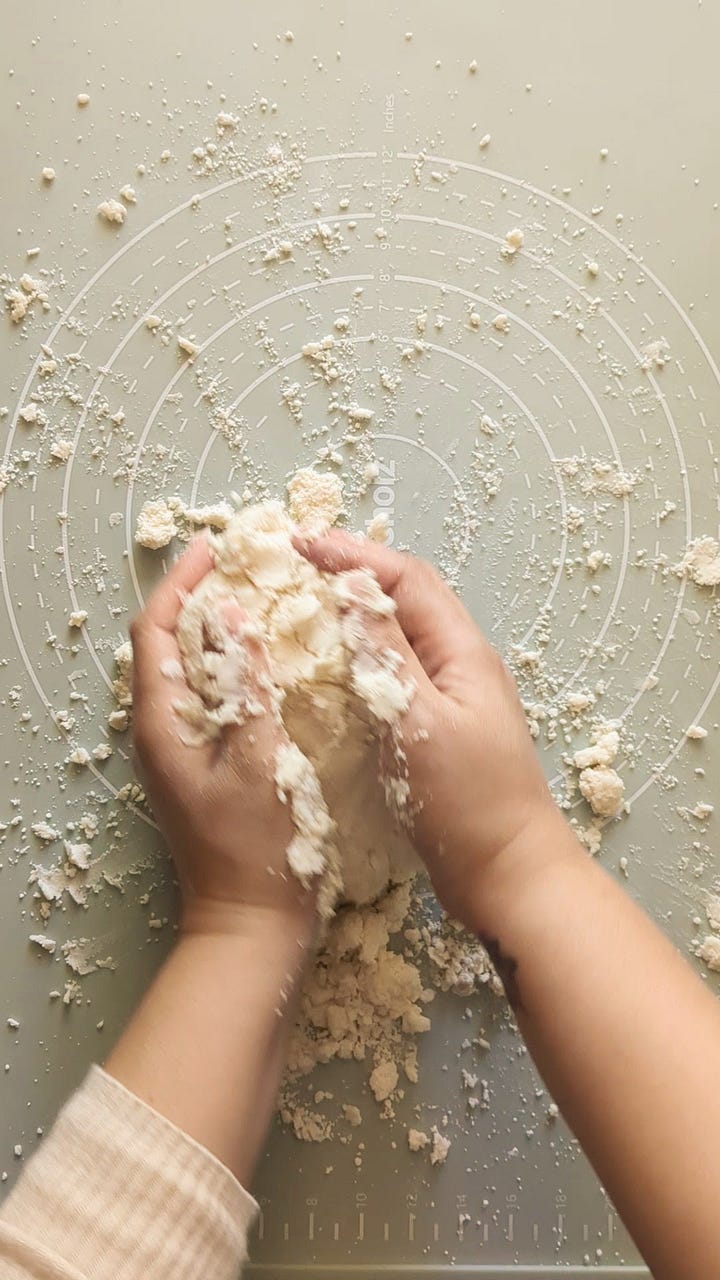
As the mixture begins to clump, turn it out onto a clean surface, and begin pressing the mixture together between your hands.
Continue kneading until you have a soft and moldable cookie dough. It should be smooth and pliable (try making a heart shape - if it cracks and falls apart, keep kneading or add another tablespoon of shortening).
Use a paring knife to split down the length of the vanilla bean, and use the flat edge to scrap out all the seeds.
Add the vanilla bean seeds to the concha topping dough, and knead it together between your hands until the seeds are evenly dispersed, making a very aesthetically pleasing and speckled dough.
Separate the topping out into 12 equal sized balls, weighing about 30 grams each.


Assemble the Conchas
At this point, your dough should be a little larger in size and soft to the touch.
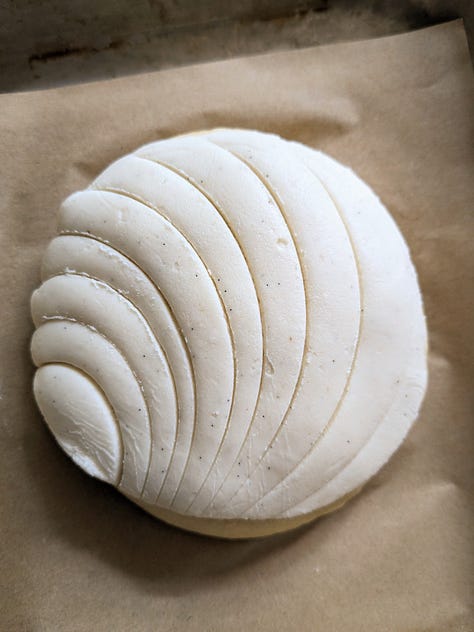
Flatten a ball of concha topping between two pieces of plastic wrap, using either a cake pan, pie plate or tortilla press. I like to press down as firmly as I can, and then use my hands to flatten the topping out even more (should be about 4.5-5 inches in diameter and thin).
Remove the top layer of plastic wrap, and gently drape the topping onto the concha dough, pressing down onto the dough a little to secure it. Gently remove the remaining piece of plastic wrap from the concha.
Repeat until all the dough has been topped.


Using a concha stamp dipped in flour (or a smooth paring knife), score each concha with a seashell design. Be sure to not press too hard - only penetrate the topping, not the dough.
If using the paring knife method, create the first line at the center of the concha. Drag the knife from the top down gently, and taper it slightly as you approach the bottom (like the inner curve of a crescent moon).
Repeat 2-3 more lines on either side of the middle line, curving in the same direction.
Once all the conchas have been scored, cover them in plastic wrap again and allow them to rise another hour. The topping will begin to spread and crack as it gets closer to baking time.
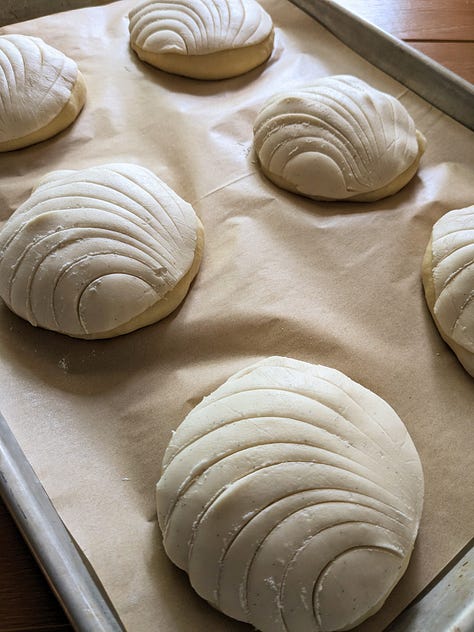
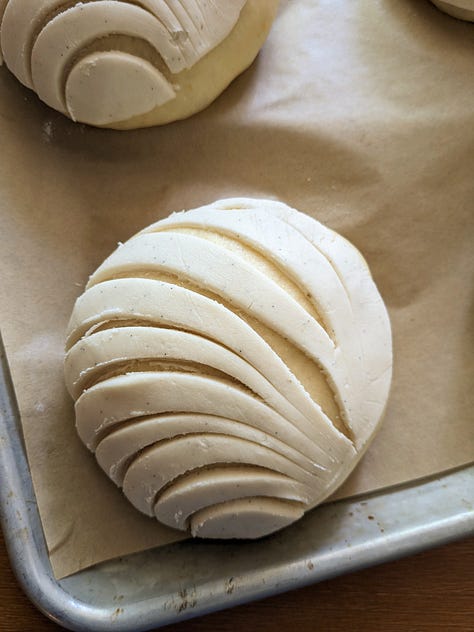
You can see the conchas are ready to bake when the topping begins to split, exposing the dough underneath.


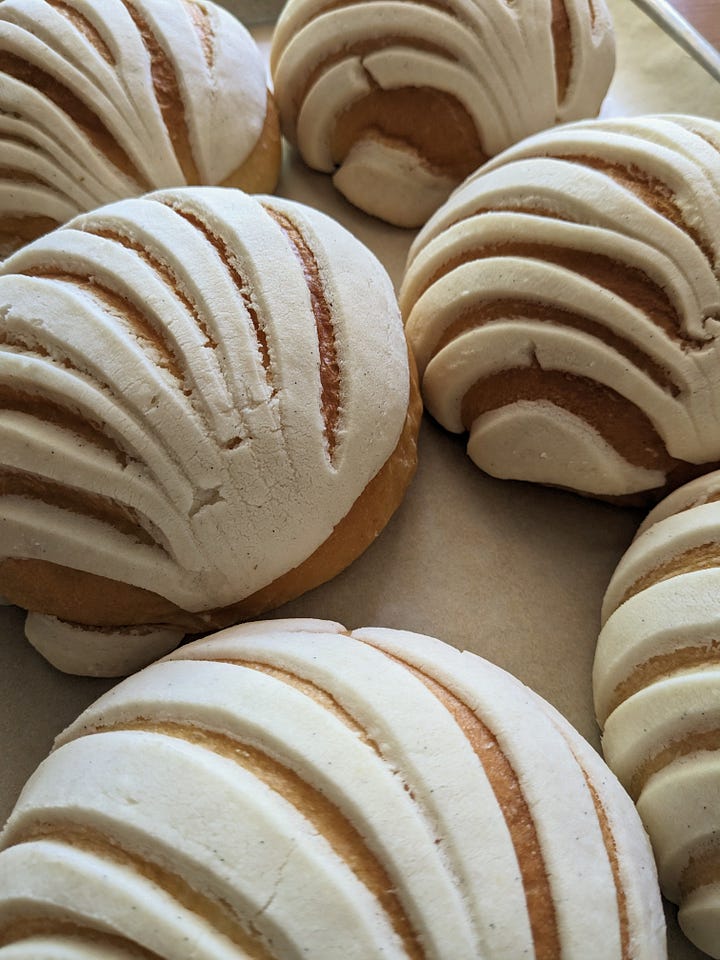
A quick note: Sometimes I get comments from readers that their conchas lack that classic, caramelized brown color after baking (a pale concha - nooooo). I bake my conchas at a lower temperature for longer to achieve even browning, but sometimes you still need a little extra help. Before applying the concha topping to the dough, apply a coat of egg wash (1 large egg whisked with 1 tablespoon milk or water) to each dough ball. This will help the concha topping adhere to the dough, and the baked results with be golden brown and beautiful.
Bake the Conchas
Preheat the oven to 325 F/165 C.
Bake each tray one at a time for a total of 24 minutes. I rotate the tray at the 12 minute mark for even browning.
Allow the conchas to cool on a wire rack for 15-20 minutes before snacking.
Enjoy your beautiful conchas with a hot cup of cafecito, or fresh fruit and cream. I personally love to sit on the couch and eat one while indulging in a show. There are so many different ways to enjoy a concha. <3
I’m going to publish my guide to baking conchas here soon. I hope it offers some helpful tips and insight into baking and troubleshooting conchas - I can’t wait to explore and share more about this beautiful process with y’all.


-Channey <3
Hi, I saw and old instagram post of matcha,strawberry and sesame topping. Could it be possible to share the recipe for recipe and sesame? Thank you